The Document Object Model
The Document Object Model (DOM) is the conceptual model used to represent an HTML document in the browser. JavaScript has built-in functionality to inspect, read, and modify every element in an HTML document using DOM-specific tools such as document.querySelector() and element.addChild(). There are many of these tools that we will use to interact with the DOM as we write our JavaScript programs.
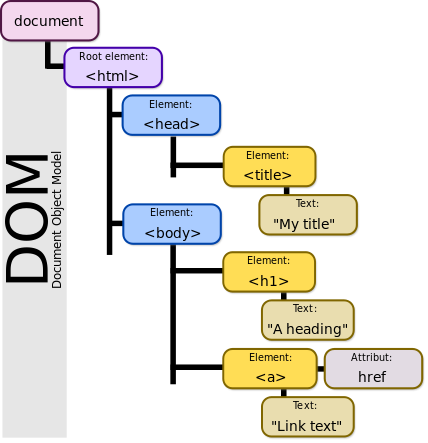
The DOM defines the way that browsers understand the structure of HTML documents. It is a tree-like hierarchy that starts with a document node, then has one html node, and then branches out to head and body nodes. Here is an illustration of what the DOM generally "looks" like in diagram form:
In JavaScript, we can use different commands to traverse the DOM's tree hierarchy in order to access any information contained within the HTML document. This makes it possible to read and interpret information, to grab sections of a document and alter them, to add elements to the document, or to remove them. It is not uncommon for a JavaScript program to spend considerable time reading data from a document's elements and their attributes, writing new elements into the document, or modifying the class name or textual content of elements.
DOM Hierarchy
As we can see in the image above, the DOM is a hierarchical structure that involves branching. It lists each HTML element (defined by an HTML tag) and relates them as either a parent, child, and/or sibling. We often talk about "traversing" or "walking" the DOM, which refers to moving along the branches of this tree. Often we need to gather up all of the children of a particular HTML element, such as when we want to access all the items in a particular list. Or we want to know the parent element of a button or link so we can provide some responsiveness for the user.
More often, we need to add elements to the document, which requires understanding if we are appending, prepending, inserting as a child, or adding as a sibling, etc. It's critical to understand the DOM hierarchy of a given document clearly in order to effectively use JavaScript to modify the document.
Of course, DOM, hierarchy is just one way we have of selecting elements. We often rely on id or class attributes to select DOM elements based on CSS select queries. This provides us with easy ways to get at the pieces of the document we need, and it allows us to create groupings of elements outside of the normal DOM hierarchy relationships. All of the techniques for traversing and selecting DOM elements are critical for success in writing interactive web pages.
Minding Style
It's easier to understand DOM hierarchy if we have a solid habit of properly indenting our HTML code. Although web browsers don't care about indentation, it is a handy visual guide for us developers who need to easily understand the organization of our DOM elements. Some developers believe that it doesn't matter how they indent their code since HTML Inspector tools available in every web browser do a great job of cleaning up and revealing the DOM hierarchy. That is true, and those tools are incredibly valuable, but it's always a good idea to keep your code properly indented and reasonably organized. Doing so will not only make your code easier to read during development, but it will help you be more aware of how the DOM of your document will be organized.
Putting It All Together
Using the DOM standard tools, JavaScript programs can also alter the CSS attributes of a given element. This means that JavaScript can be used in conjunction with HTML and CSS to create very dynamic visual representations of HTML content. Elements can be made to move, take on different styles, perform various functions, and much more.
As an example, we can consider the following snippets of JavaScript, CSS, and HTML.
html
<button class="btn save">Save Item</button>
css
.save {
    background: blue;
    color: white;
    content: 'Save Item';
}
.saved {
    background: blue;
    color: yellow;
    content: 'Saved!';
}
js
let saveButtons = document.querySelectorAll('.btn .save');
saveButtons.forEach(function(button){
    button.addEventListener('click', function(event){
        event.target.setAttribute('class', 'btn saved');
        event.target.setAttribute('disabled', true);
    });
});
We will dive deeper into how each part of this code works over the course of the next few sections of this book, but for now it's useful to see that we have all three parts of our web technology trifecta at play: HTML, CSS, and JavaScript. The HTML specifies the content of the document, and it describes that content using HTML tags to define specific elements, their attributes, and other characteristics such as href, class, or id. The CSS configures the visual presentation of specific HTML elements, using the CSS Selector syntax to match elements, and then describing visual attributes of those elements such as background or color.
JavaScript is the interactive glue that binds together each of these components and allows instructions to be executed in response to a user's interaction with the document. In the case above, we can see a <button> element defined in HTML. It has the class attribute, which contains "btn save". We can imagine that this is a button on a content website, perhaps, where users may wish to save the content they find. (Think of the "Watch Later" button on YouTube, or the "favorite" button on so many sites.) This button is initially styled according to the classes defined on the HTML element using the class attribute. However, this can be changed via JavaScript, which is able to select all of those buttons out of the document and add an "event listener" (which we will discuss in the next section) to respond to the user's click on the button. When the user clicks the button, the event listener executes a set of instructions that alter the classes applied to the button and disable the button from being clicked again.
We will explore more about how each of these steps work in the JavaScript code, but for now it's useful to admire how the DOM provides the mechanism for each of these discrete technologies to operate in conjunction to give us a working web page. This allows a separation of concerns (content structuring, visual presentation, interactive instructions/logic) that makes it more convenient to build these deceptively complex media objects.