Project: Deploying the App
In order to practice deploying apps, we can update the configuration in the project skeleton we created for the past two sections. We will deploy our site to the Github Pages server, which is a popular, and free, static website server. Since all of our files are compiled and built by Webpack, we can deliver them as static files to our end users.
In order to make all of this happen, we will need to alter the Webpack configuration as described earlier in this section, then set up Github to server our pages from the docs/ directory. Once we set all of that up, then we need only to commit and push our code to deploy our updated build.
Create a Repository
If we have not already created a Github repository, let's do so. On github, click the big green "New" button that shows up on our profile page. This should bring you to the Create New Repository page.

Create New Repository screen
Give the repository a name, and then select private or public. We do not need to add a README.me or any LICENSE.md files because we already have a bunch of files.
Once the repository is created, follow the directions to create the new repository from files on the command line:

New repository instructions
The only thing we should do different is instead of doing the command git add README.md we should add everything with git add -A. Once we have followed these directions, we should be able to see our repository on Github.com. Verify that all of our files are there, and then move on to the next step of configuring Webpack.
Configuring Webpack
Once we have created our repository on Github, we must configure Webpack to build our files into the docs/ directory. This requires us to make changes to the config/index.js file. In short, we need to change the paths from dist to docs and then we also need to set the assetsPublicPath to ''.
Here is what the config/index.js file looks like after we make these changes:
var path = require('path')

module.exports = {
  build: {
    env: require('./prod.env'),
    index: path.resolve(__dirname, '../docs/index.html'),
    assetsRoot: path.resolve(__dirname, '../docs'),
    assetsSubDirectory: 'static',
    assetsPublicPath: '',
    productionSourceMap: true,
    productionGzip: false,
    productionGzipExtensions: ['js', 'css'],
    bundleAnalyzerReport: process.env.npm_config_report
  },
  dev: {
    env: require('./dev.env'),
    port: 8080,
    autoOpenBrowser: true,
    assetsSubDirectory: 'static',
    assetsPublicPath: '/',
    proxyTable: {},
    cssSourceMap: false
  }
}
Save those changes and then run the build command:
npm run build
We should see a build report in the console (but not the web browser). Take a moment to confirm that no errors occurred. If everything looks good, then commit and push our changes to Github.
Configure Github Pages
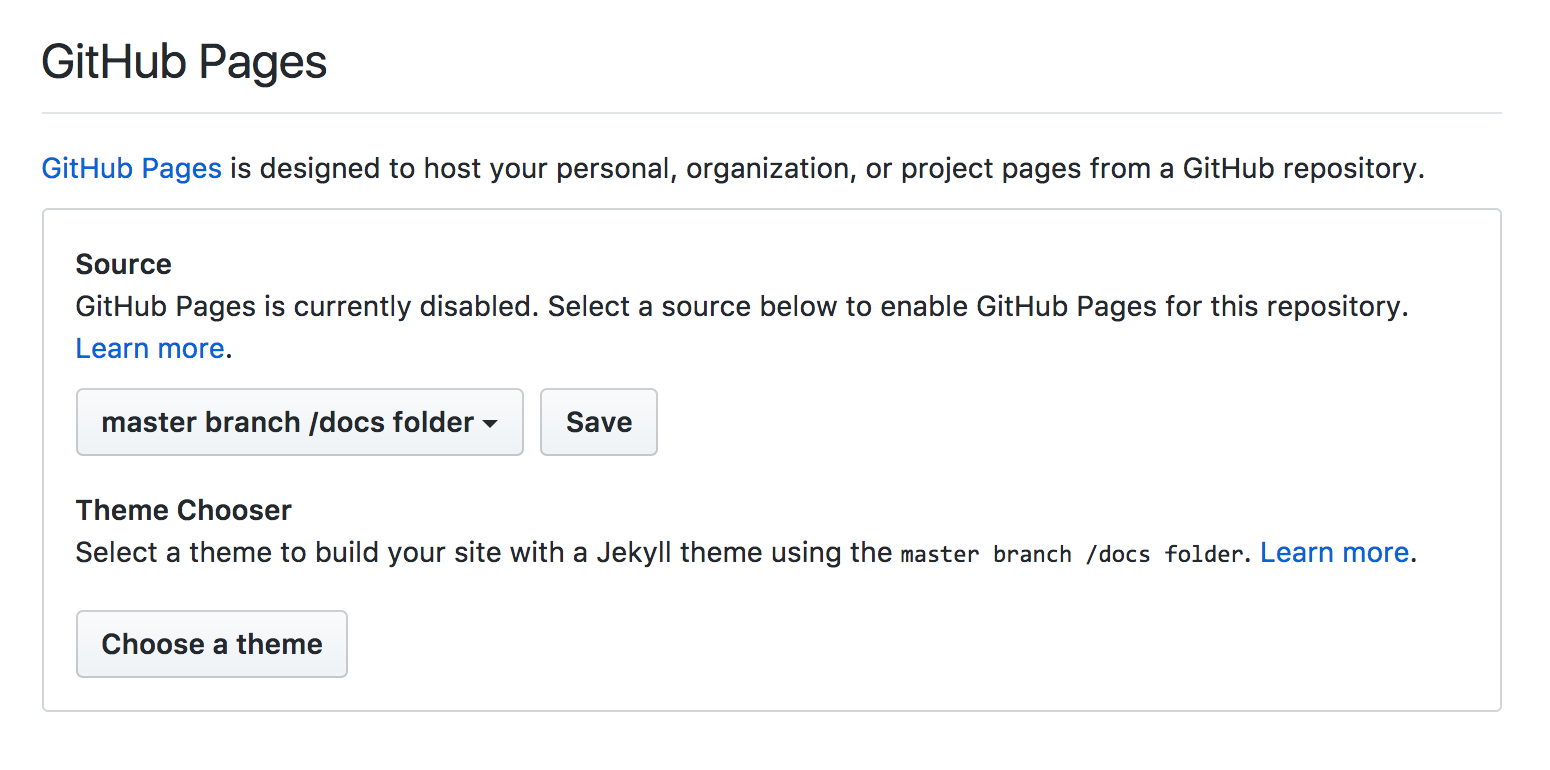
In order to deploy our site to Github Pages, we must alter the settings on our repository. From the repository homepage, click "Settings". Scroll down on the main page of the Settings until you find the Github Pages area:

GitHub Pages configuration
The Source setting should be "master branch /docs folder". This will allow our users to view our project at a URL that matches the pattern https://username.github.io/project-name/. When we click "Save" next to the GitHub Pages Source setting, the Settings page will refresh and it will show you the URL where our site has been deployed. Give it a few moments and the bar should turn from blue to green, indicating that the site is ready to be viewed.
Click the link and witness the awesomeness of our first deployed Vue.js application!
Full Repository
If you need to review a working repository with full code, look at this working repository to see all of the edits we made in this project.